Sign in to Facebook using your standard credentials. Navigate to http://www.facebook.com/developers/ and click “Set Up New Application.”
Enter a name for your application.

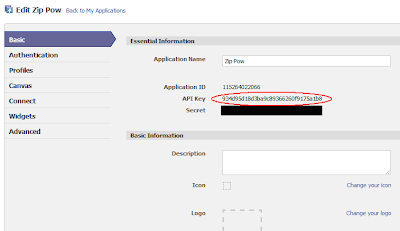
Make note of your API Key. You will need this later. You can come back to this page any time to get it.

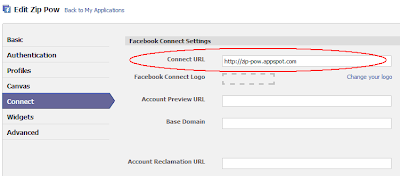
Click the “Connect” section on the left. Then enter the base domain name of the website where your application is hosted into the “Connect URL” field. Click the “Save Changes” button at the bottom of the page.

That’s it. You are now the proud developer of a Facebook application, which is required for using Facebook Connect.
Unlike most of the Facebook applications we are used to seeing on the Facebook site, our application does not have an interface for users on the Facebook site. This is something you could certainly add it you need it, but it is not necessary when using Facebook Connect.
Step 2: Add the facebook4gwt JAR to your project .
Go to http://code.google.com/p/facebook4gwt/. Click “downloads” and grab the latest JAR.
Add the JAR to the build path of your GWT project. I’m using an Eclipse project and building it with the Google Eclipse plugin. So I just go to the configure build path dialog, click “Add JARs…” or “Add External JARs…” and select the JAR I just downloaded.
Now add the following line to your module XML file to tell it to include the facebook4gwt module.
<inherits name="com.reveregroup.gwt.facebook4gwt.Facebook4gwt"></inherits>
Step 3: Initialize Facebook Connect.
Facebook Connect needs to be initialized on your web page before using any of its features.
With facebook4gwt, this is accomplished with one simple call:
Facebook.init(
This is the API Key that we noted in Step 1 above.
I am making the call in the onModuleLoad() method of my EntryPoint, but you can put it anywhere as long as it comes before you try to use any of its other features.
Step 4: Use the API
Now you’re ready to connect with Facebook. Here are a few examples of what you can do.
Provide a login button
The vast majority of Facebook Connect features require a user to be logged in to Facebook through your site. The API provides a login button that can be placed on your page for a visitor to sign in. It can be used as any other GWT Widget:
loginButton = new LoginButton();
RootPanel.get("facebookLogin").add(loginButton);
Listen for login events
You can register a login listener that is fired whenever a user logs in or out:
Facebook.addLoginHandler(new FacebookLoginHandler() {
public void loginStatusChanged(FacebookLoginEvent event) {
if (event.isLoggedIn()){
statusLabel.setText("Logged in");
} else {
      statusLabel.setText("No user logged in");
}
}
});
Get information about a user
The API exposes methods for getting information about the current user or any user given their numeric ID.
In this example we get the current user’s name, status and profile picture. It’s an asynchronous call, so the result is returned to an instance of AsyncCallback.
You also need to specify which information you want the call to fetch for you. These methods use varargs to allow you to easily specify as many items as you need. UserField is an enum with all the possible items.
Facebook.APIClient().users_getLoggedInUser(new AsyncCallback() {
public void onSuccess(FacebookUser result) {
userName.setText(result.getName());
userImage.setUrl(result.getPic());
userInfoPanel.setVisible(true);
  }
    public void onFailure(Throwable caught) {
    userInfoPanel.setVisible(false);
  }
}, UserField.NAME, UserField.STATUS, UserField.PIC);
Share with friends
You can add Facebook “Share” buttons to your page in various styles. Again these are just GWT widgets.
new ShareButton(URL_TO_SHARE, TITLE_FOR_POST);
A more advanced option is to post to the user’s wall using templates to customize exactly what information is shown and how. For more on creating facebook feed templates see this blog entry.
The API works like this...
- Create an instance of FacebookStory and set the template bundle
id. You should be able to find the this id with the template you created on
Facebook's site. - Set the content for your post:
- Set any key-value pairs of data that your template needs using the
putData(String, String) method. - Add the images, video, mp3 or flash data you want (if any).
- Set bodyGeneral if desired.
- Set any key-value pairs of data that your template needs using the
- Optionally, configure the dialog with setPrompt() and setDefualtUserMessage().
- Finally, call showFeedDialog(). This will display a dialog
window for your user to confirm the message and possibly add their own
comments. If they approve, the message will be posted to their wall and to
their friends news feeds.
Here is an example:
FacebookStory fbStory = new FacebookStory();
fbStory.setTemplateBundleId(Constants.FEED_TEMPLATE_ID);
fbStory.setPrompt("Add your thoughts if you like...");
fbStory.putData("headline", article.getHeadline());
fbStory.putData("story_url", Constants.APP_URL);
fbStory.setBodyGeneral(article.getContent());
fbStory.addImage(article.getImageURL(), Constants.APP_URL);
fbStory.showFeedDialog();
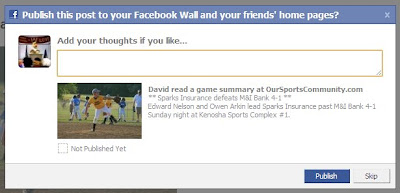
And here's the confirmation dialog displayed by this code.

That's about all there is to it. The actual Facebook API has many more features available than shown here. Over time the facebook4gwt team hopes to build more and more of these features into their implementation, so be watching for that.


